When you get a web hosting account for your business, you can choose to either host a single website or choose more than one website in the same hosting account. The web hosting company considers one domain as the primary one and rest of the domains can be added as an add-on domain.
Let’s understand how this works with an example.
Let’s say you own abc.com and xyz.com. You create a new web hosting account with a hosting company and avail a monthly or yearly subscription plan. When you create the subscription plan, you will be asked to enter the domain name which you want to add to your account.
This is the primary domain name which gets associated with your web hosting account. Your web hosting company will remember your account using the primary domain name. However, you can add other websites to the same web hosting account as add-on domains.
In this tutorial, we will learn how to add an add-on domain in Bluehost web hosting.
Add Add-on Domain In Bluehost Web hosting
Here are the steps you need to follow
- Before you add an add-on domain to your Bluehost web hosting account, you must point name servers of your domain to Bluehost web hosting name servers. Open the control panel of your domain name registrar and set the name servers to your Bluehost web hosting account. This is the first step without which you will not be able to add the add-on domain to your Bluehost web hosting control panel.
- Once you are done pointing the nameservers of your domain to Bluehost, it is time to add the add-on domain. Login to the control panel of your Bluehost web hosting account. Under “Domains” section, click on “Domain manager”.

- In the “Domain manager” page, click on the shortcut link “Assign a domain to your cPanel account.

- In the text field “Use a domain that is not already associated with your account”, type the name of your domain (without the www).

So if the address of your domain is – www.mywebsite.com, you should type mywebsite.com in the above text field. - Next, Bluehost will try to verify if this domain’s name servers are pointing to the name servers of Bluehost. If Bluehost is able to verify that the name servers of the typed domain points to the name servers of Bluehost, it will successfully verify your ownership of the domain name.If the name servers are not verified, you will see a message like below

Now you may wonder, how much time it takes a domain registrar to change name servers for your domain name? The answer is – it depends from one registrar to another and how much time it takes for the DNS changes to take effect at your Internet Service provider. Typically, what I have observed is that DNS changes are propagated within one hour. Sometimes, DNS changes are propagated instantly within a few minutes. But there are situations when DNS changes may take at least 24 – 48 hours to propagate at your ISP.
Such a long time is a rarity and in most cases, it should propagate within an hour. If you don’t see the DNS changes propagating, don’t panic. It will eventually happen. Double check the name server settings for your domain name at your domain registrar and verify whether the name servers have really updated or not. You can use Whoishostingthis.com to see if the name servers have really changed or not.
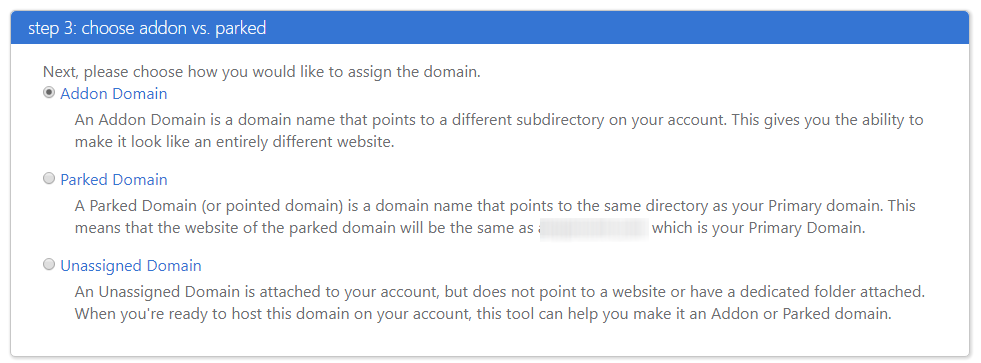
- Once Bluehost has verified ownership of your domain name and successfully confirmed the name servers pointing to Bluehost, you can proceed to the next step. In this step, choose “Add the domain as an Add-on domain”

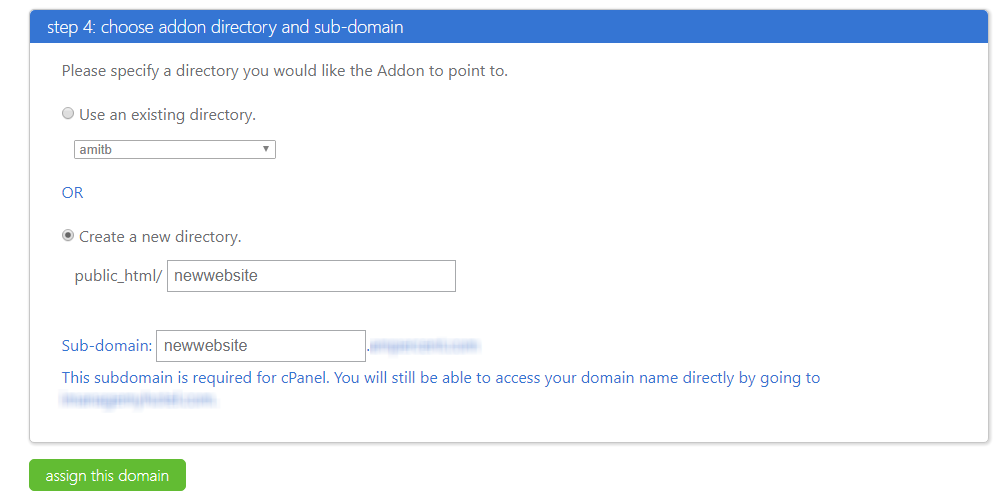
- Next, you will need to choose an add-on directory and the subdomain. If you don’t know what that means, I will quickly explain so that you are aware what is going to happen once you add the add-on domain. For now, choose the option “Create a new directory”, enter the name of your website (without the www and the .com. Enter only the name e.g if your website is www.mywebsite.com, you should be entering mywebsite)

- Once you are done with this section, click the button “Assign this domain” and you are done.


Now go to the control panel home and open file manager, you should see a new directory in your main website’s public_html folder. The name of the directory will be equal to the name of your add-on domain which you just added to your Bluehost account.
What about the subdomain? Basically, bluehost adds an add-on domain as a subdomain and that subdomain is accessible from the web address – newdomain.primarydomain.com.
So if your primary domain name is abc.com and your add-on domain name is xyz.com, the add-on domain will be accessible as a sub domain of the primary domain at xyz.abc.com. But there is little to worry since search engines do not consider sub domain as a part of the main website. They consider sub domains as separate entities, so you would be fine from SEO and crawling perspectives.
301 redirect the sub domain created for the add-on domain to it’s Root
It is indeed a good practice to 301 redirect the subdomain which got created as a result of adding the add-on domain to the root of the add-on domain. It will achieve two objectives
- First, it will redirect anyone trying to access the subdomain to the root of the add-on domain which is always the best thing to do for human visitors and anyone trying to guess a subdomain from the primary domain associated with your web hosting account.
- Second, it explicitly tells search engines that the subdomain is actually the add-on domain you have added to your account. This prevents canonical and other duplicate content issues, since the same content will not be accessible from two different domain names. There are instances where website owners have reported that their sites got flagged because the subdomain which was being created as a result of adding an add-on domain wasn’t redirecting to the add-on domain properly and the same content was accessible from two different URL’s.
To ensure you don’t have to deal with all of the above, all you need to do is drop the following code in the .htaccess file placed at the root of your add-on domain. Be sure to edit the htaccess file of the add-on domain and not the primary domain.
The code
Options All -Indexes

RewriteEngine on
RewriteCond %{HTTP_HOST} ^addon\.primary\.com$ [OR]
RewriteCond %{HTTP_HOST} ^www\.addon\.primary\.com$
RewriteCond %{REQUEST_URI} !^/[0-9]+\..+\.cpaneldcv$
RewriteCond %{REQUEST_URI} !^/[A-F0-9]{32}\.txt(?:\ Comodo\ DCV)?$
RewriteRule ^/?$ "http\:\/\/www\.addon\.com\/" [R=301,L]
RewriteCond %{HTTP_HOST} ^addon\.com$ [OR]
RewriteCond %{HTTP_HOST} ^www\.addon\.com$
RewriteCond %{REQUEST_URI} !^/[0-9]+\..+\.cpaneldcv$
RewriteCond %{REQUEST_URI} !^/[A-F0-9]{32}\.txt(?:\ Comodo\ DCV)?$
RewriteRule ^/?$ "http\:\/\/addon\.com\\/" [R=301,L]
In the above code, I have marked two words – primary and addon. Replace them with the name of your primary and addon names.
So that concludes the tutorial on how you should add an add-on domain to your Bluehost web hosting account. If you are facing difficulties adding an add-on domain to your account, please let us know in the comments section below.